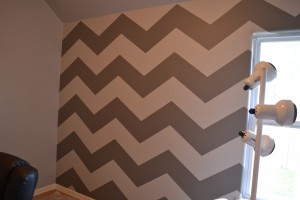
A couple of weeks ago, my sweet sister-in-law helped me paint the entire office. After it’s had a bit to cure, we decided to tackle the accent wall… in chevron.
Now one might think a few zig zags on the wall is a simple thing… or if you’ve tried to do it before, you might think it’s the most ridiculous thing you’ve ever decided to do. Luckily, our experience was somewhere in the middle. There was definitely some math involved, but thanks so some wonderful bloggers, we finally figured it out. (One that helped the most!)
We decided we wanted the outside to be sloping down (not up, it just looks unfinished) and that the middle should have a point (so the wall wouldn’t look short), which means that there should be an odd number of points. This means 3 or 5 points… and three was just not enough. Then, multiply by 2, for each half section of the chevron, we needed 10 sections. Our wall was 143″, so we divided that by 10, which is 14.3″. Not a nice round number, so we rounded to 14 3/8″ for the middle 8 sections and figured you wouldn’t be able to tell on the outside 2. Better they be short than start to go back up and look weird.
Next, we wanted the stripes to be 10″ tall (we liked the look from the blog above), so we divided our 93″ by 10 and had 3 inches left over on the bottom… which ended up working out because it’s a light gray triangle, not the start of another row.
Using their handy dandy laser level, we drew these lines of 14 3/8″ wide across the room and 10″ down the wall with a piece of chalk until we had a grid like this…
This took a ridiculously long time to do because we drew each line “free hand” with chalk. My advice… use a chalk line. If you don’t have one. Buy one. It will be worth your time. For real.
Then, using Frog Tape (which I also highly recommend! It came out so great!), we taped from the top corner to the bottom corner of each rectangle of the grid, starting in the center. Above the line to be painted should be on the top of the chalk line and below should be under so you get the full 10″.
We went all the way down the center mark until we had a Christmas tree. The top of each chevron, you just overlap the tape. On the bottom, where the point comes in, we used an X-acto knife to cut the tape to be a perfect point. We found that cutting the top piece shorter than the edge and then X-acto-ing the bottom piece was easier than trying to cut both perfectly straight. We also used a marker to make arrows (because I’m crazy) so we knew which side of the line to paint on and which was the outside.
It took us all night to finish the taping… and we got a little goofy.
Arielle, doing Tree pose in front of our wall of trees! But you can see the inside of each point is cut clean and the outside doesn’t really matter. Also, does it look like some rows are skinnier than others? Yeah, it’s supposed to. Those skinny rows are the ones you don’t paint. The width of the tape takes up part of the space of those rows.
Luckily, the in-laws were coming back the next day to watch the Indy500 that we recorded from Memorial Sunday, so we got to paint!
First, we painted the original color over the tape to activate the “Paint Block Technology” because my walls are textured and annoyingly so.
Then, after that dried to the touch, we painted… sorry, got too busy to take pics! …. and then painted a second coat.
Once that was dry to the touch (barely), we started taking the tape off. We are of the mind that tape should come off as soon as possible. If you leave it, you have to wait several days to a week for the paint to cure, or you risk pulling the paint. And by that time, the tape has most likely adhered to the paint under it and will probably peel it off too. So we opted for as soon as possible. We took Dan Brady’s advice over on the Frog Tape website, and pulled the tape back at 120 degrees rather than straight up. It really helps to keep the paint from peeling (especially latex). Basically, double it back on itself as you pull and you’ll be good.
Now I just need to start putting stuff back where it belongs and get the rest of the room set up! Stay tuned because I’m going to update you on the total progress of this room soon! (Right after a brief garage sale we’re having this weekend!)


